Firewall Appliance (Fortinet) using a public subnet pool
In this scenario, you will reserve a public subnet provided by Infomaniak. The advantage of reserving a subnet is the ability to get a contiguous IP range for your instances (/29 or /28), to facilitate your firewall configuration for example and remote rules.
Info
Public Subnet pools require access to the infomaniak provider network ext-provider1 which is possible upon request to our support.
When reserving the public subnet pool, one IP will be used for DHCP and a second one for the router gateway.
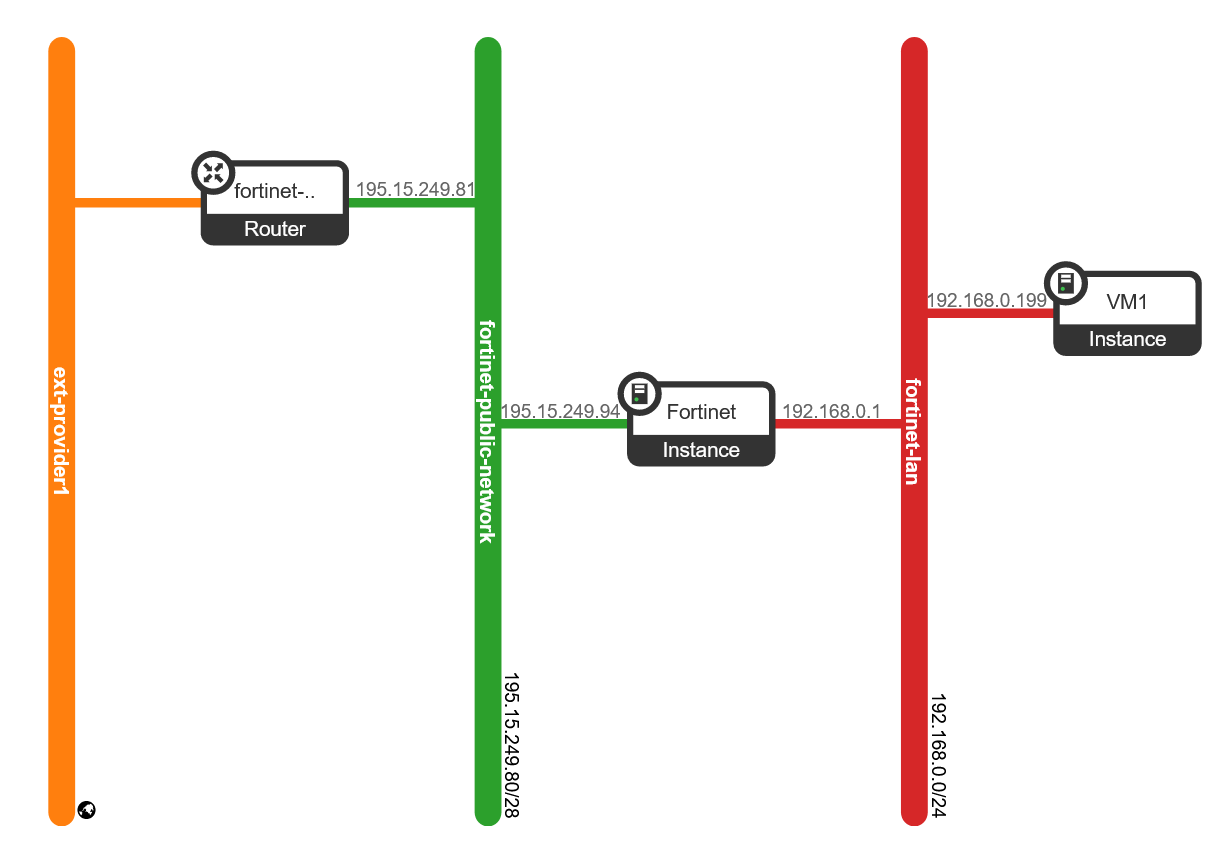
This HEAT template reserves a public subnet pool, creates a VM (in our example a Fortinet VM) with 2 interfaces. One interface on the internet and a second one on a private LAN where will reside your private VMs. We will also configure a Virtual IP on the Fortinet appliance to reach the private VM.
Prerequisite
Make sure you have the HEAT client installed
Download a Fortinet cloud image on the fortinet website. In our case it is a FortiOS_7_0_1 image.
Create the stack
The command below will create a Firewall appliance VM with 2 network interfaces. One connected to a reserved public network and the second one connected to a private LAN.
taylor@laptop (pub1|taylor):~$ openstack stack create -t https://docs.infomaniak.cloud/tutorials/04.firewall/fortinet.yaml --parameter firewall_image_name=_FortiOS_7_0_1  --parameter firewall_server_name=Fortinet --parameter wan_subnet_prefix=28 fortinet --wait
2023-01-04 09:34:21Z [fortinet]: CREATE_IN_PROGRESS  Stack CREATE started
2023-01-04 09:34:21Z [fortinet.wan_net]: CREATE_IN_PROGRESS  state changed
2023-01-04 09:34:21Z [fortinet.wan_net]: CREATE_COMPLETE  state changed
2023-01-04 09:34:21Z [fortinet.wan_subnet]: CREATE_IN_PROGRESS  state changed
2023-01-04 09:34:22Z [fortinet.lan_net]: CREATE_IN_PROGRESS  state changed
2023-01-04 09:34:22Z [fortinet.wan_subnet]: CREATE_COMPLETE  state changed
2023-01-04 09:34:22Z [fortinet.lan_net]: CREATE_COMPLETE  state changed
2023-01-04 09:34:22Z [fortinet.firewall_server_wan_port]: CREATE_IN_PROGRESS  state changed
2023-01-04 09:34:22Z [fortinet.lan_subnet]: CREATE_IN_PROGRESS  state changed
2023-01-04 09:34:23Z [fortinet.public_router]: CREATE_IN_PROGRESS  state changed
2023-01-04 09:34:23Z [fortinet.lan_subnet]: CREATE_COMPLETE  state changed
2023-01-04 09:34:23Z [fortinet.firewall_server_lan_port]: CREATE_IN_PROGRESS  state changed
2023-01-04 09:34:24Z [fortinet.firewall_server_wan_port]: CREATE_COMPLETE  state changed
2023-01-04 09:34:25Z [fortinet.firewall_server_lan_port]: CREATE_COMPLETE  state changed
2023-01-04 09:34:25Z [fortinet.firewall_server]: CREATE_IN_PROGRESS  state changed
2023-01-04 09:34:30Z [fortinet.public_router]: CREATE_COMPLETE  state changed
2023-01-04 09:34:30Z [fortinet.public_router_subnet_interface]: CREATE_IN_PROGRESS  state changed
2023-01-04 09:34:35Z [fortinet.public_router_subnet_interface]: CREATE_COMPLETE  state changed
2023-01-04 09:34:40Z [fortinet.firewall_server]: CREATE_COMPLETE  state changed
2023-01-04 09:34:40Z [fortinet]: CREATE_COMPLETE  Stack CREATE completed successfully
+---------------------+-------------------------------------------------------------------------------------------------------------------------------------------------------------------------------------------------------------------------------------------------------------------+
| Field               | Value                                                                                                                                                                                                                                                             |
+---------------------+-------------------------------------------------------------------------------------------------------------------------------------------------------------------------------------------------------------------------------------------------------------------+
| id                  | eac83076-e6a8-43f2-b8ed-090ab331ca7d                                                                                                                                                                                                                              |
| stack_name          | fortinet                                                                                                                                                                                                                                                          |
| description         | Firewall Appliance template using a reserved pool of public IPs. This template creates an appliance with a VM acting as a firewall with 2 network interfaces, one connected to the internet (WAN) and  the second one connected to a newly created network (LAN). |
|                     |                                                                                                                                                                                                                                                                   |
| creation_time       | 2023-01-04T09:34:20Z                                                                                                                                                                                                                                              |
| updated_time        | None                                                                                                                                                                                                                                                              |
| stack_status        | CREATE_COMPLETE                                                                                                                                                                                                                                                   |
| stack_status_reason | Stack CREATE completed successfully                                                                                                                                                                                                                               |
+---------------------+-------------------------------------------------------------------------------------------------------------------------------------------------------------------------------------------------------------------------------------------------------------------+
- Retrieve details such as WAN IP using the command
openstack stack show <stack name>
taylor@laptop (pub1|taylor):~$ openstack stack show fortinet
+-----------------------+-------------------------------------------------------------------------------------------------------------------------------------------------------------------------------------------------------------------------------------------------------------------+
| Field | Value |
+-----------------------+-------------------------------------------------------------------------------------------------------------------------------------------------------------------------------------------------------------------------------------------------------------------+
| id | eac83076-e6a8-43f2-b8ed-090ab331ca7d |
| stack_name | fortinet |
| description | Firewall Appliance template using a reserved pool of public IPs. This template creates an appliance with a VM acting as a firewall with 2 network interfaces, one connected to the internet (WAN) and the second one connected to a newly created network (LAN). |
| | |
| creation_time | 2023-01-04T09:34:20Z |
| updated_time | None |
| stack_status | CREATE_COMPLETE |
| stack_status_reason | Stack CREATE completed successfully |
| parameters | OS::project_id: d1440aa24a65411fb9bac2b842c8defa |
| | OS::stack_id: eac83076-e6a8-43f2-b8ed-090ab331ca7d |
| | OS::stack_name: fortinet |
| | firewall_flavor_name: a1-ram2-disk20-perf1 |
| | firewall_image_name: _FortiOS_7_0_1 |
| | firewall_server_name: Fortinet |
| | lan_net_name: lan |
| | wan_net_name: public-network |
| | wan_subnet_prefix: '28' |
| | |
| outputs | - description: Tips |
| | output_key: Usage Notes |
| | output_value: Configure the Firewall via the VM console if no internet access yet |
| | (OPNsense, Fortigate... ). |
| | - description: LAN IP address for the Firewall appliance VM (vtnet1) |
| | output_key: WAN IP |
| | output_value: 195.15.249.94 |
| | - description: LAN IP address for the Firewall appliance VM (vtnet0) |
| | output_key: LAN IP |
| | output_value: 192.168.0.1 |
| | - description: Console URL for the Firewall appliance VM |
| | output_key: VM Console |
| | output_value: https://api.pub1.infomaniak.cloud:443/novnc/vnc_auto.html?path=%3Ftoken%3D41f07df8-1684-4628-ae86-9be27eb9f6ab |
| | |
| links | - href: https://api.pub1.infomaniak.cloud/orchestration-api/v1/d1440aa24a65411fb9bac2b842c8defa/stacks/fortinet/eac83076-e6a8-43f2-b8ed-090ab331ca7d |
| | rel: self |
| | |
| deletion_time | None |
| notification_topics | [] |
| capabilities | [] |
| disable_rollback | True |
| timeout_mins | None |
| stack_owner | taylor |
| parent | None |
| stack_user_project_id | c4f908e883d04dc6a17b15ccb77e115b |
| tags | [] |
| | |
+-----------------------+-------------------------------------------------------------------------------------------------------------------------------------------------------------------------------------------------------------------------------------------------------------------+
Fortinet public WAN IP is 195.15.249.94
Fortinet LAN IP is 192.168.0.1
Allow access to the Fortinet appliance web panel using the VM console
Once the stack is created, the appliance VM is up and running but no connection is possible yet for security reasons.
You have to make the first configuration steps using the VM console :
 openstack console url show Fortinet
+----------+----------------------------------------------------------------------------------------------------------------+
| Field    | Value                                                                                                          |
+----------+----------------------------------------------------------------------------------------------------------------+
| protocol | vnc                                                                                                            |
| type     | novnc                                                                                                          |
| url      | https://api.pub1.infomaniak.cloud:443/novnc/vnc_auto.html?path=%3Ftoken%3Dd6de4acc-1955-4236-ab52-4d4fbe072752 |
+----------+----------------------------------------------------------------------------------------------------------------+
- Log in using the default Fortinet credentials.
admin and no password. You will be asked to provide a new password.
Once logged in enable the web panel on both network interfaces.
config system interface
   edit port1
   set mode dhcp
   set allowacces http https
end

config system interface
   edit port2
   set mode dhcp
   set allowacces http https
end
Now you can connect to the web panel:
http://195.15.249.94
FortiGate Virtual IP
- Now that the appliance is ready we will configure a Virtual IP to reach a private VM.
First of all we create a VM on the private LAN.
taylor@laptop (pub1|taylor):~$ openstack server create --key-name yubikey-taylor --flavor a1-ram2-disk20-perf1 --image "Debian 11.6 bullseye" --network fortinet-lan VM1
taylor@laptop (pub1|taylor):~$ openstack server list
+--------------------------------------+----------+--------+-----------------------------------------------------------------+----------------------+----------------------+
| ID                                   | Name     | Status | Networks                                                        | Image                | Flavor               |
+--------------------------------------+----------+--------+-----------------------------------------------------------------+----------------------+----------------------+
| 6c0b599a-0157-4ec1-8be6-913c93365ee3 | VM1      | ACTIVE | fortinet-lan=192.168.0.199                                      | Debian 11.6 bullseye | a1-ram2-disk20-perf1 |
| c9b13c81-cc4b-4210-a4eb-3b246e3725ae | Fortinet | ACTIVE | fortinet-lan=192.168.0.1; fortinet-public-network=195.15.249.94 | _FortiOS_7_0_1       | a1-ram2-disk20-perf1 |
+--------------------------------------+----------+--------+-----------------------------------------------------------------+----------------------+----------------------+
To see the public IPs already allocated from the subnet pool you can use this command :
taylor@laptop (pub1|taylor):~$ openstack port list --network fortinet-public-network
+--------------------------------------+------------------------------------------------+-------------------+------------------------------------------------------------------------------+--------+
| ID                                   | Name                                           | MAC Address       | Fixed IP Addresses                                                           | Status |
+--------------------------------------+------------------------------------------------+-------------------+------------------------------------------------------------------------------+--------+
| 3317a1be-145b-474e-b95e-eba7bc7488a3 |                                                | fa:16:3e:cc:28:e3 | ip_address='195.15.249.81', subnet_id='b0795ecb-6eb4-4ca5-99c1-633ecba49f69' | ACTIVE |
| b59e4903-71a6-41fc-90d1-e45cf4416854 | fortinet-firewall_server_wan_port-vm5xir3ed5tf | fa:16:3e:ab:8a:e5 | ip_address='195.15.249.94', subnet_id='b0795ecb-6eb4-4ca5-99c1-633ecba49f69' | ACTIVE |
| b7e3fc67-ff79-4079-b856-b1b1aca0ea01 |                                                | fa:16:3e:f8:c7:a8 | ip_address='195.15.249.82', subnet_id='b0795ecb-6eb4-4ca5-99c1-633ecba49f69' | ACTIVE |
+--------------------------------------+------------------------------------------------+-------------------+------------------------------------------------------------------------------+--------+
195.15.249.81 = gateway
195.15.249.82 = dhcp server
195.15.249.94 = fortinet VM
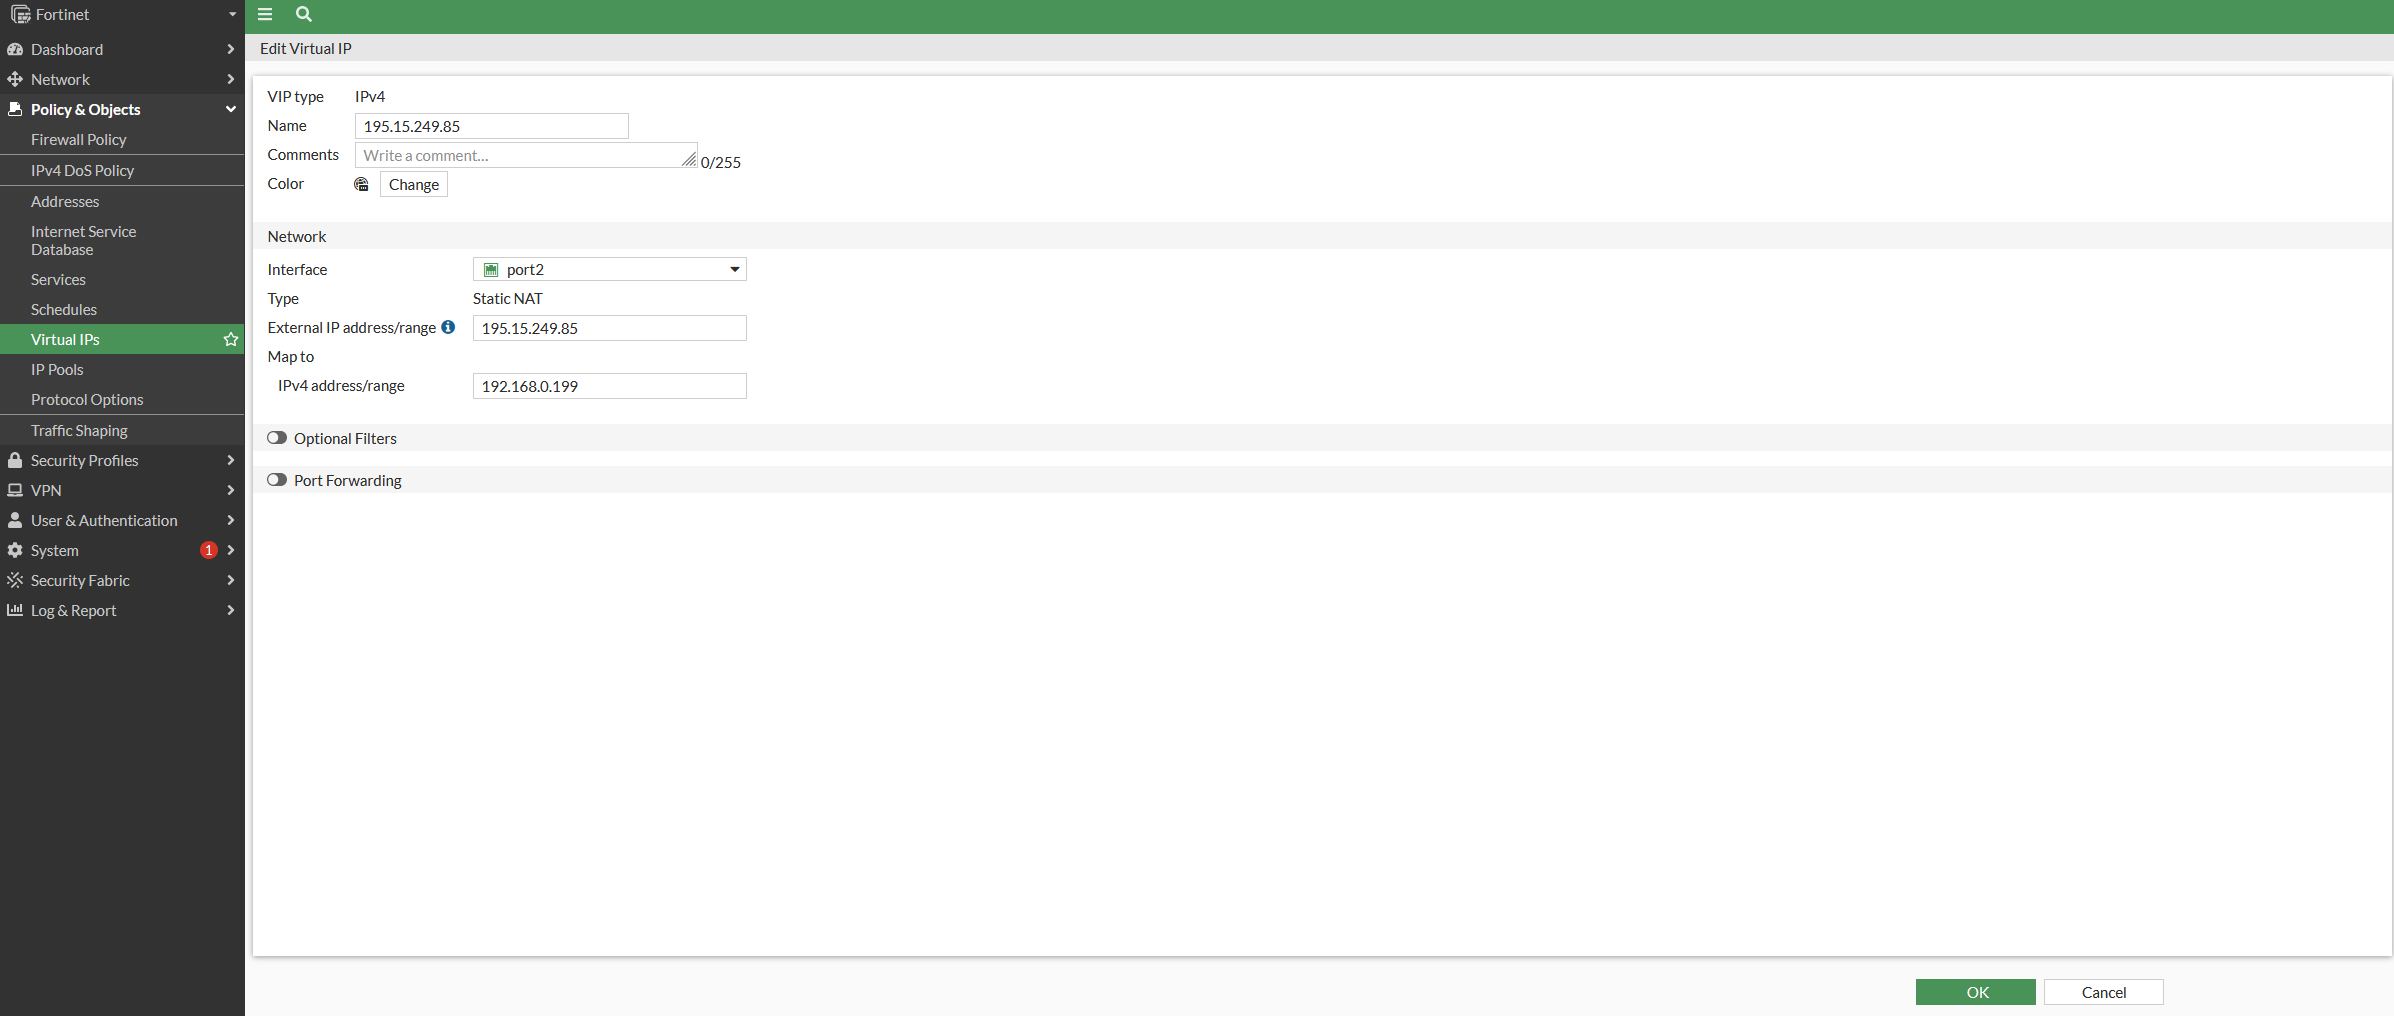
Let's redirect a unallocated IP, let's say 195.15.249.85, to 192.168.0.199.
-
Login to the web panel, in our case the url is
http://195.15.249.94 -
Configure the Virtual IP
- Configure the LAN to WAN firewall rule
Firstly create the private IP address
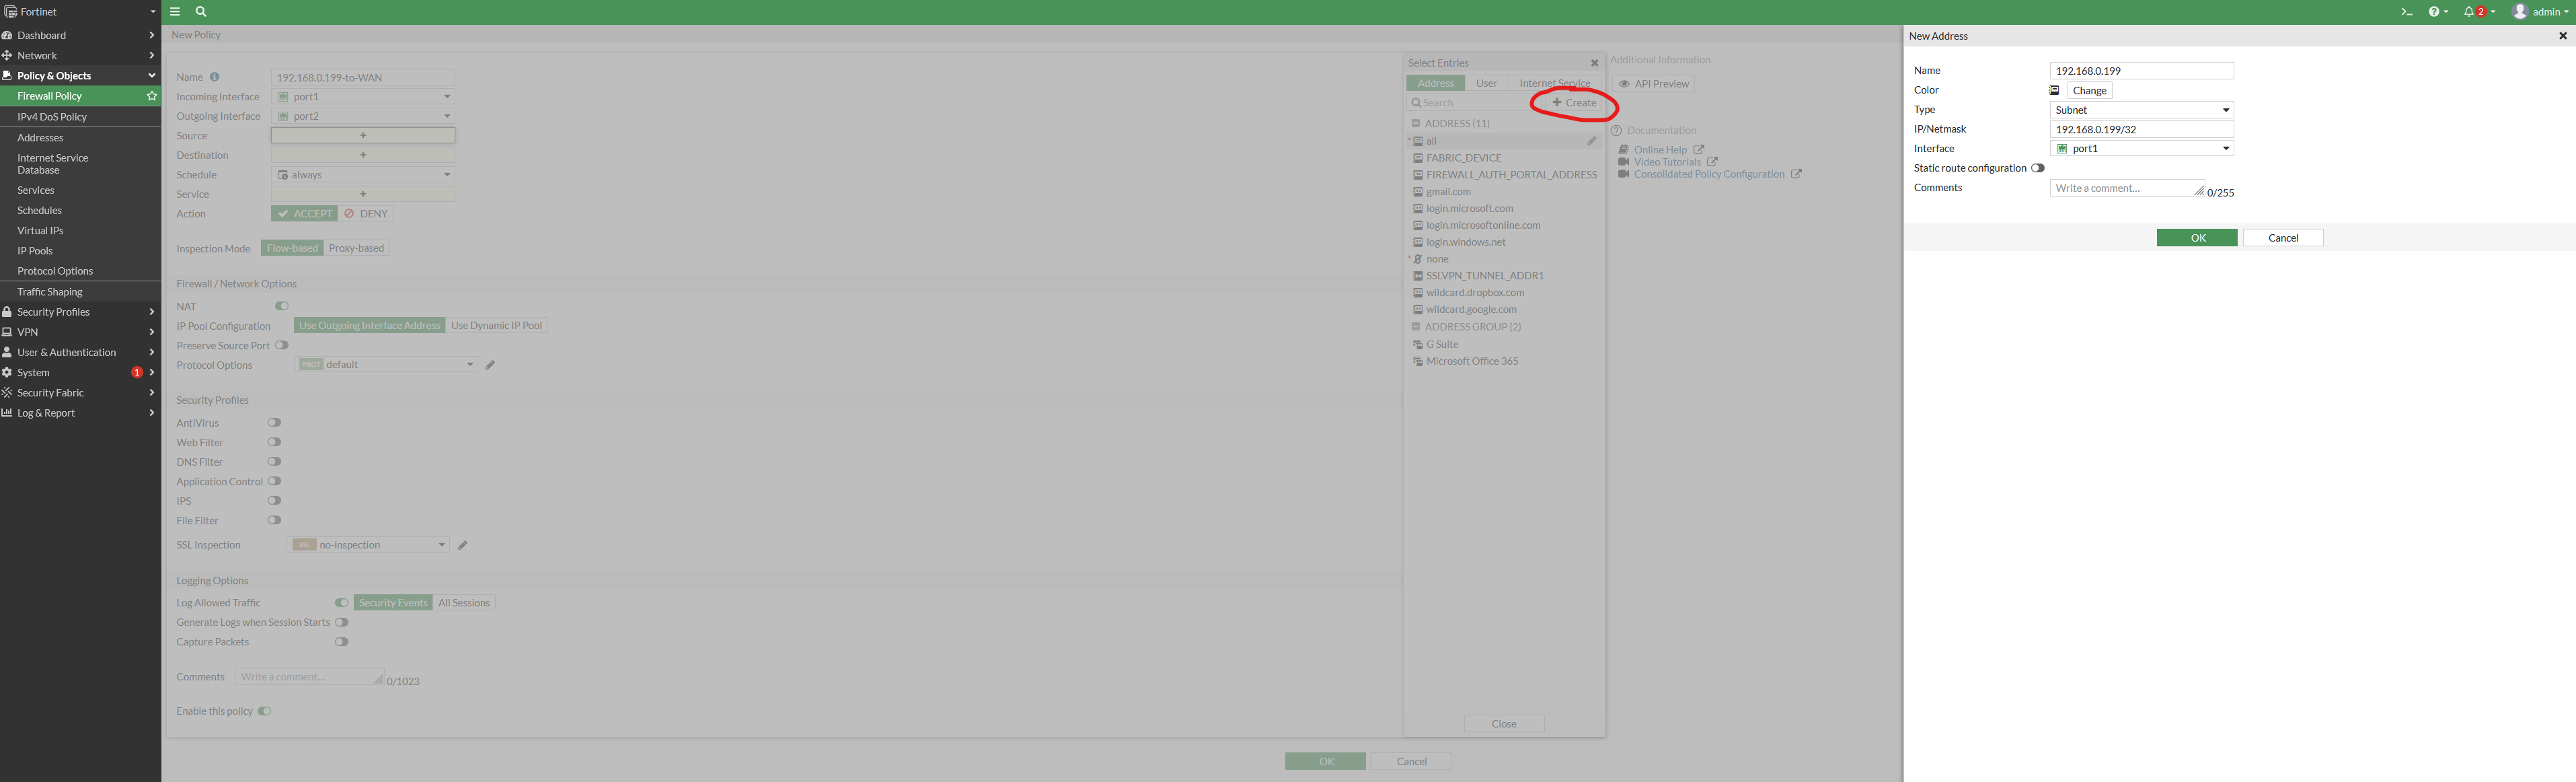
Secondly create the firewall rule

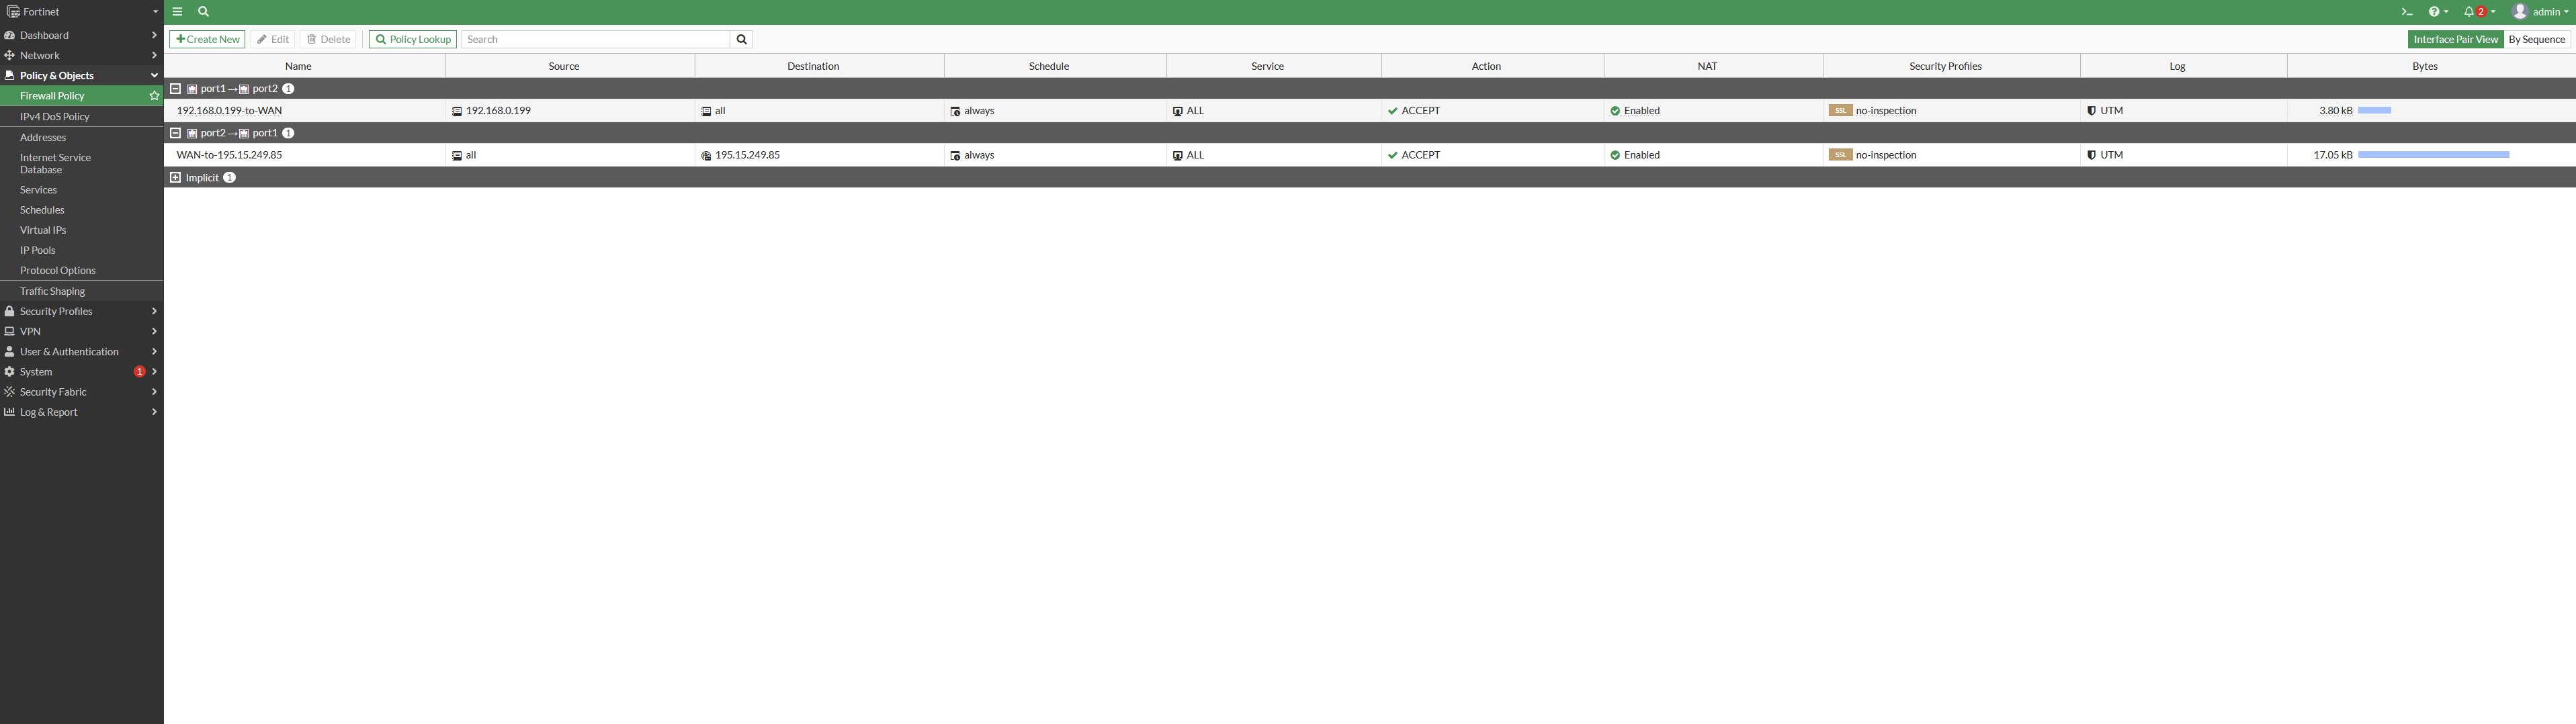
- Configure the WAN to VIP firewall rule

- Overview of the 2 firewall rules
- You can now ssh your virtual machine.
taylor@laptop (pub1|taylor):~$  ssh debian@195.15.249.85
Linux vm1 5.10.0-20-cloud-amd64 #1 SMP Debian 5.10.158-2 (2022-12-13) x86_64

The programs included with the Debian GNU/Linux system are free software;
the exact distribution terms for each program are described in the
individual files in /usr/share/doc/*/copyright.

Debian GNU/Linux comes with ABSOLUTELY NO WARRANTY, to the extent
permitted by applicable law.
Last login: Mon Jan  2 15:36:19 2023 from 192.168.0.1
debian@vm1:~$