Nextcloud
Use swift as main storage backend
To use swift object storage as the main storage backend on Nextcloud, you must add theses line in your config/config.php and change theses values:
- Username (PCU-XXXXXX)
- Password
- Project name (PCP-XXXXXX)
'objectstore' => [
        'class' => 'OC\\Files\\ObjectStore\\Swift',
        'arguments' => [
                'autocreate' => true,
                'user' => [
                        'name' => 'PCU-XXXXXX',
                        'password' => 'YOUR_PASSWORD',
                        'domain' => [
                                'name' => 'Default',
                        ],
                ],
                'scope' => [
                        'project' => [
                                'name' => 'PCP-XXXXXX',
                                'domain' => [
                                        'name' => 'Default',
                                ],
                        ],
                ],
                'serviceName' => 'swift',
                'region' => 'dc3-a',
                'url' => 'https://api.pub1.infomaniak.cloud/identity/v3',
                'bucket' => 'nextcloud',
        ],
],
<?php
$CONFIG = array (
  'htaccess.RewriteBase' => '/',
  'memcache.local' => '\\OC\\Memcache\\APCu',
  'apps_paths' =>
  array (
    0 =>
    array (
      'path' => '/var/www/html/apps',
      'url' => '/apps',
      'writable' => false,
    ),
    1 =>
    array (
      'path' => '/var/www/html/custom_apps',
      'url' => '/custom_apps',
      'writable' => true,
    ),
  ),

  .....

  'objectstore' =>
  array (
    'class' => 'OC\\Files\\ObjectStore\\Swift',
    'arguments' =>
    array (
      'autocreate' => true,
      'user' =>
      array (
        'name' => 'PCU-XXXXXX',
        'password' => 'YOUR_PASSWORD',
        'domain' =>
        array (
          'name' => 'Default',
        ),
      ),
      'scope' =>
      array (
        'project' =>
        array (
          'name' => 'PCP-XXXXXX',
          'domain' =>
          array (
            'name' => 'Default',
          ),
        ),
      ),
      'serviceName' => 'swift',
      'region' => 'dc3-a',
      'url' => 'https://api.pub1.infomaniak.cloud/identity/v3',
      'bucket' => 'nextcloud',
    ),
  ),
);
Save your changes and refresh your application in your web browser. If the container doesn't exist, it will be automatically created by the Nexcloud application.
You can check if your data are stored in swift directly on the container with Horizon interface for example.

Now all data of all nextcloud users will be stored in swift.
Use swift as external storage backend
There is a second way to use swift, you can use use swift storage as an external storage backend. This mode allow you to permit each nextcloud users can mount their own swift container individually or you can shared mount points with groups or users specificaly.
To configure swift as an external storage you need to install "External Storage Support" application from the nextcloud application librairy. Next you can access to external storage configuration from "Settings" pannel and "Administration" section.
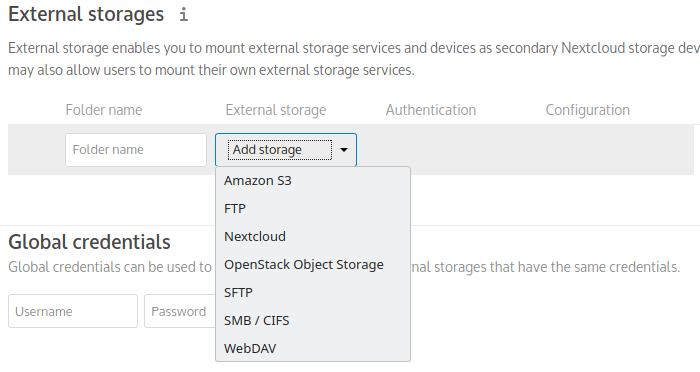
Once you are in configuration panel select the external storage type "OpenStack Object Storage" and give a folder name.
In authentitaction column select "OpenStack v3" and complete the configuration column with these informations:
Region: dc3-a
Bucket: the name of your container
Username: PCU-XXXXXX
Domain: Default
Password: your password
Tenant name: PCP-XXXXXX
Identity endpoint URL: https://api.pub1.infomaniak.cloud/identity/v3