Backups and Snapshots
Tip
Locally installed backup client (SwissBackup)
If you are interested in, infomaniak provides a facility to perform backups within the instance by installing a client program and providing the list of directories to save. Get more information about SwissBackup here and simply follow the procedure to install and configure the tool
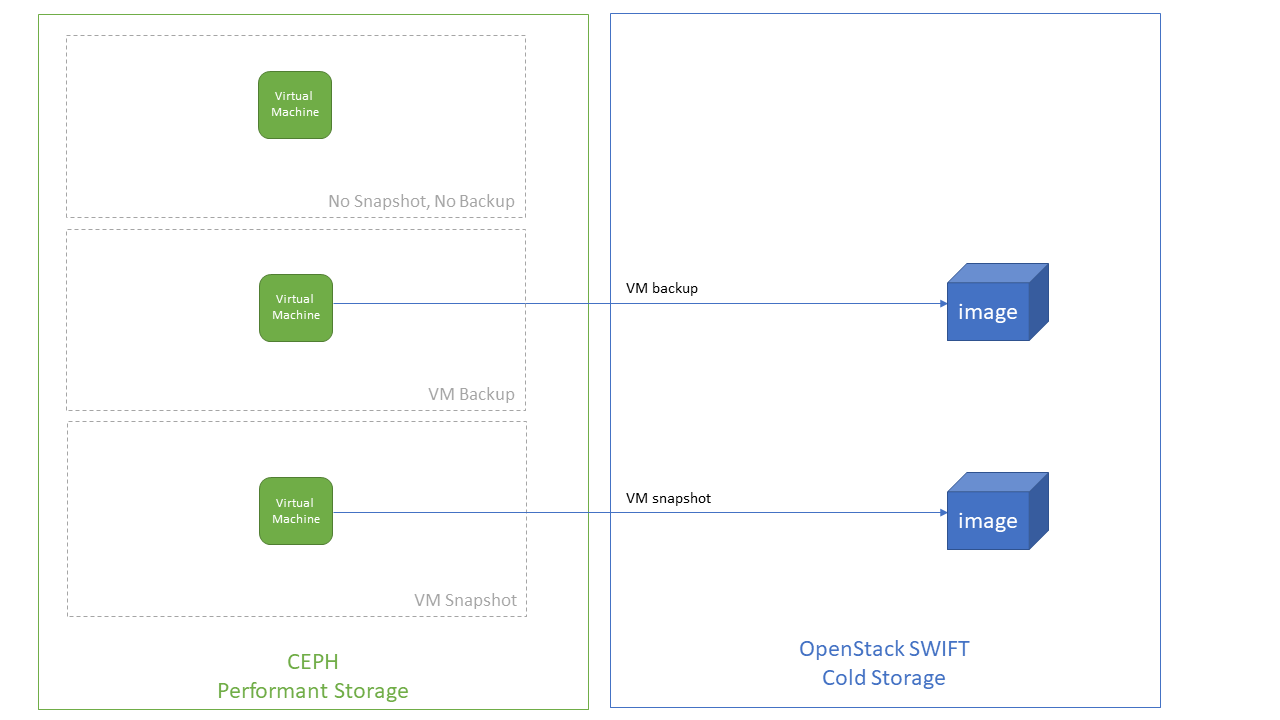
There is no integrated automated backup as part of the Infomaniak Openstack Public Cloud. For many configurations, data is stored on reliable data stores such as CEPH.
However, in some cases, there is a desire for backup and restore of data stored on a instance. A number of approaches can be used to cover these needs.
Snapshotting also provides the possibility to clone a instance such as for testing or a production upgrade where you clone the current production to a new instance, upgrade and then adjust an IP alias to point to the new instance.
Info
Backups and snapshots are exactly the same thing. Both are images stored on our cold storage.
Snapshots for rollback & rebuild
Typical use cases for a rollback and rebuild is a test environment with a reference configuration for the start of the tests. The test can be executed, checked and then the original state recovered.
The first step is to create a snapshot file (a bootable image) of the instance into OpenStack Glance. It will give you the ability to build or rebuild a instance based with the configuration you had at the start of your tests.
Use openstack server rebuild --image <imageID-or-snapshotID> to reset or rollback a instance with same IP and hostname. This is much faster than deleting the old server and creating a new one with the same name (of the order of 2-3 minutes). if you don't specify --image, the VN will be rebuilt with the same base image it is running.
Info
It takes a long time to do the snapshot and during the process the machine can become unresponsive for a few minutes. It is recommended to resync the instance clocks using the NTP daemon or running ntpdate after the snapshot has completed.
- Creating the snapshot
$ taylor@laptop:~$ openstack server image create --name my-snapshot --wait my-instance-name
Finished
$ openstack image show --fit-width my-snapshot
Using this snapshot, the instance can be rolled back to the previous state with a server rebuild.
$ openstack server rebuild --image my-snapshot my-instance-name
Snapshots for testing and cloning
In this use case, a instance is being used for a production service and you need to test a new software version. The operation is done in 3 steps :
Snapshot a instance
$ openstack server image create --name my-snapshot --wait my-instance-name
Download the image
$ openstack image save --file /tmp/my-snapshot.raw my-snapshot
Remove context information
Running the sysprep tools on the snapshot removes the custom host information such as the hardware addresses and unique identifiers. This is necessary to avoid conflicts with the currently running instance when a new clone of the instance is created.
Note you can pass the parameter --delete folowed by the path of a specific file to delete it. This option can be used multiple times
$ LIBGUESTFS_BACKEND=direct virt-sysprep --add /tmp/my-snapshot.raw
[   0.0] Examining the guest ...
[   4.5] Performing "abrt-data" ...
[   4.5] Performing "backup-files" ...
[   4.8] Performing "bash-history" ...
[   4.8] Performing "blkid-tab" ...
[   4.8] Performing "crash-data" ...
[   4.9] Performing "cron-spool" ...
[   4.9] Performing "dhcp-client-state" ...
[   4.9] Performing "dhcp-server-state" ...
[   4.9] Performing "dovecot-data" ...
[   4.9] Performing "logfiles" ...
[   5.0] Performing "machine-id" ...
[   5.0] Performing "mail-spool" ...
[   5.0] Performing "net-hostname" ...
[   5.2] Performing "net-hwaddr" ...
[   5.4] Performing "pacct-log" ...
[   5.4] Performing "package-manager-cache" ...
[   5.5] Performing "pam-data" ...
[   5.5] Performing "passwd-backups" ...
[   5.5] Performing "puppet-data-log" ...
[   5.5] Performing "rh-subscription-manager" ...
[   5.6] Performing "rhn-systemid" ...
[   5.6] Performing "rpm-db" ...
[   5.6] Performing "samba-db-log" ...
[   5.7] Performing "script" ...
[   5.7] Performing "smolt-uuid" ...
[   5.7] Performing "ssh-hostkeys" ...
[   5.7] Performing "ssh-userdir" ...
[   5.7] Performing "sssd-db-log" ...
[   5.8] Performing "tmp-files" ...
[   5.8] Performing "udev-persistent-net" ...
[   5.8] Performing "utmp" ...
[   5.8] Performing "yum-uuid" ...
[   5.9] Performing "customize" ...
[   5.9] Setting a random seed
[   5.9] Setting the machine ID in /etc/machine-id
[   6.0] Performing "linstance-uuids" ...
Now upload the cleaned image to Glance so a new instance can be created from it
$ openstack image create --file /tmp/my-snapshot.raw --property os=LINUX --disk-format=raw --container-format=bare my-cleaned-snapshot
Create a new server
$ openstack server create --key-name mykeypair --flavor cpu2-ran6-disk20 --image my-cleaned-snapshot my-new-instance
Snapshots to move between projects or clouds
In some scenarios, you need to move a instance between projects. Typical example would be if you have accidentally created a instance in your Personal project and actually need it for production use in a shared project.
Other scenarios would be if you have a working instance in one OpenStack cloud and you needed to move it to another.
The following procedure is available for Linux instances only.
The steps are
- Authenticate to the source project
- Shutdown the source instance
- Make a snapshot of the source instance
- Download the snapshot to a file
- Apply the de-contextualization step described in the previous section, limiting the number of operations:
The command virt-sysprep is provided by the package libguestfs-tools (sudo apt-get install libguestfs-tool)
$ LIBGUESTFS_BACKEND=direct virt-sysprep --add /tmp/my-snapshot.raw --enable udev-persistent-net,net-hwaddr
If you want to keep the same hostname, check the snapshot is correct (i.e. it seems a reasonable size) and then delete the source instance.
- Authenticate to the new project you want to create the destination instance in
- Upload the snapshot file to Glance in the new project
- Create a new server from the snapshot
Rename a instance
You can rename openstack instance name using the command below but it won't change the hostname inside your instance.
$ openstack server set --name my-new-name UUID-instances
Otherwise the full procedure to create instances with different names is the following :
As above, the steps are similar
- Authenticate to the source project
- Shutdown the source instance
- Make a snapshot of the source instance
- Download the snapshot to a file
- Sysprep the snapshot to clean the hostname information
- Upload the new image to Glance
- Create a new server from the snapshot file with the new hostname
- (If all is working OK), delete the old instance