HA load-balancer with HTTP backends
Introduction
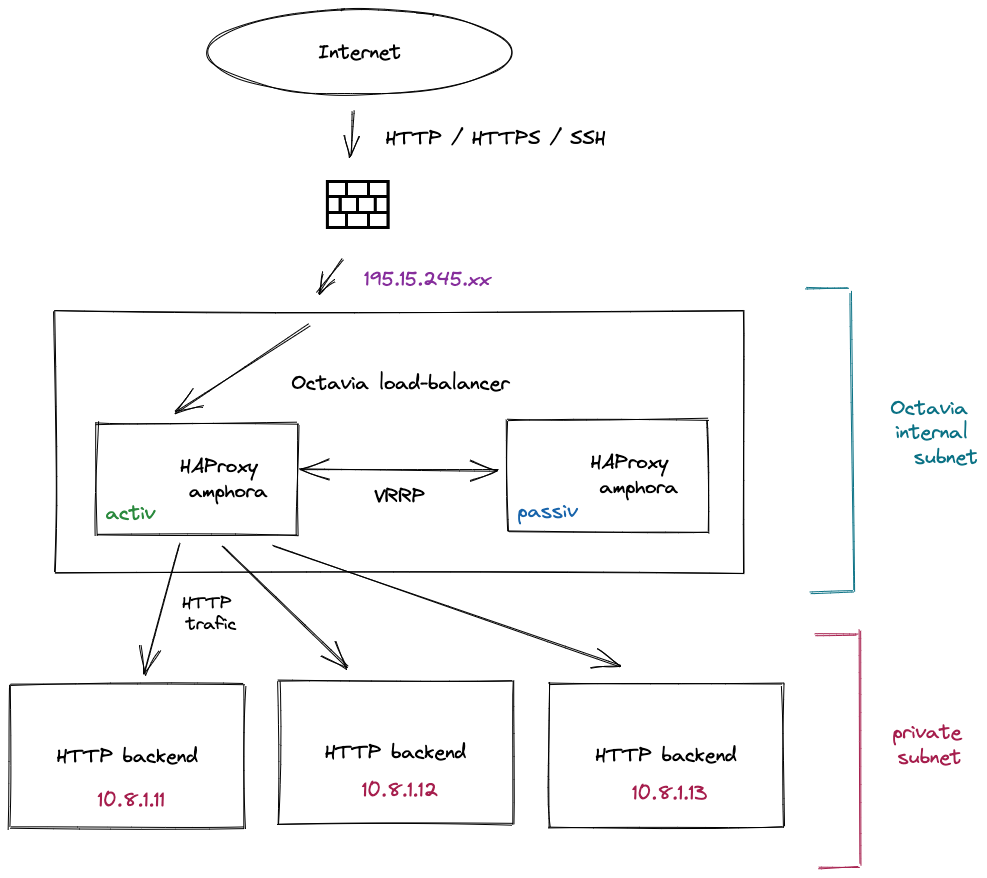
Deploy a highly-available Octavia load-balancer with its HTTP backends.
to Heat or not
Theses Heat templates are directly inspired from this guide Load Balancers (Octavia). In case you prefer a manual setup, switch to that guide.
Features
- HA load-balancing
- HTTP health monitors
- TLS termination
- custom cloud-init
- dedicated pools for SSH access
Project hierarchy
.
├── README.md
├── env.yaml
├── lib
│   ├── cloudinit.conf
├── nested
│   ├── backend.yaml
│   ├── listener.yaml
│   ├── pool-member.yaml
│   └── pool.yaml
└── template.yml
Prerequesites
CLI clients
To begin with make sure you have all the necessary clients installed.
Please refer to the OpenStack CLI clients
Keypair
Use the following command to ensure you have your keypair ready, the name should match the backends_key_name in env.yaml.
$ openstack keypair list
+-------------+-------------------------------------------------+------+
| Name        | Fingerprint                                     | Type |
+-------------+-------------------------------------------------+------+
| yubikey     | 32:32:75:2d:d1:02:d9:1f:a4:34:4b:ca:78:39:32:49 | ssh  |
+-------------+-------------------------------------------------+------+
If you have no keypair setup yet, please create one first using this guide.
Setup
First of all, clone the following repository : Infomaniak Github
The most important part is located in the env.yaml file. Make sure to review every parameter so that it suits you needs.
Parameters
Load-balancer are composed by multiple pieces of software, if you are not familiar with them we recommend you to first read Load Balancers (Octavia) guide.
Warning
In this section, parts of the stack parameters will be detailed by section but not all of them so it is recommended to review all of them in env.yaml
By default you get 3 HTTP backends.
If you wish to decrease / increase the number of backend do not forget to adjust the matching keys.
Warning
You may notice that some parameters seem to have odd values like pool_members_ports: 22,22,22,80,80,80 for instance. This is due to a Heat limitation when using a OS::Heat::ResourceGroup. For this reason a explanation is given along each parameters to make sure you get it right.
backends
Represent the instances where your workload resides
| Parameter | Default | Comment |
|---|---|---|
| backend_count | 3 | |
| backends_key_name | None | |
| backends_prefix_name | backend |
|
| backends_image | Debian 10.11 buster |
if you use another distro, pay attention to cloud-init.conf |
| backends_flavor | a1-ram2-disk20-perf1 |
|
| backends_ips | 10.8.1.11,10.8.1.12,10.8.1.13 |
|
| backend_security_groups | SSH,HTTP |
|
| security_groups_remote_ip_cidr_ssh | 10.0.0.0/8 |
IP range to allow SSH from |
| security_groups_remote_ip_cidr_http | 0.0.0.0/0 |
wide open |
listeners
By default, with 3 backends the listener_count is 4 because you have 3 TCP listeners representing the dedicated SSH ports for each backend + 1 for the HTTP protocol that will obviously be load-balanced accross those 3 backends
Warning
Do not consider HTTPS here as it is handled separately
| Parameter | Default | Comment |
|---|---|---|
| listener_count | 4 | number of backend + number of protocols ø SSH ø HTTPS |
| listeners_protocols | TCP,TCP,TCP,HTTP |
3 dedicated listeners for individual SSH access + HTTP |
| listeners_ports | 2121,2222,2323,80 |
has to respect the order of listeners_protocols |
pools
When it comes to the pools you have the same kind of logic.
| Parameter | Default | Comment |
|---|---|---|
| pool_count | 4 | number of backend + number of protocols ø SSH ø HTTPS |
| pools_protocols | TCP,TCP,TCP,HTTP |
3 dedicated pools for individual SSH access + HTTP |
| pools_load_balancer_algorithms | SOURCE_IP,SOURCE_IP,SOURCE_IP,ROUND_ROBIN |
SOURCE_IP for the SSH and either ROUND_ROBIN or LEAST_CONNECTIONS for the HTTP. |
| pools_session_persistence | SOURCE_IP,SOURCE_IP,SOURCE_IP,HTTP_COOKIE |
SOURCE_IP for the SSH and either HTTP_COOKIE or APP_COOKIE for the HTTP pool. |
pool members
| Parameter | Default | Comment |
|---|---|---|
| pool_member_count | 6 | ( number of protocol ø HTTPS ) * number of backend |
| pool_members_addresses | 10.8.1.11,10.8.1.12,10.8.1.13,10.8.1.11,10.8.1.12,10.8.1.13 |
here comes the nasty stuff. We have to do it this way because we need to map each SSH pool with its member and the HTTP pool with the N backend members |
| pool_members_pools | pool-0,pool-1,pool-2,pool-3,pool-3,pool-3 |
the 3 first items are for the dedicated SSH and the 3 last one because we want to load-balance HTTP accross those N backends |
| pool_members_ports | 22,22,22,80,80,80 |
accordingly you have 3 times SSH port and 3 times HTTP |
If you use TLS termination and with to scale-up/down, do not forget to adjust those parameters as well. Hopefully this part is more simple.
| Parameter | Default | Comment |
|---|---|---|
| pool_member_tls_count | 3 | match the backend_count parameter |
| pool_members_tls_pools | pool-https,pool-https,pool-https |
backend_count * pool_tls_name |
| pool_members_tls_addresses | 10.8.1.11,10.8.1.12,10.8.1.13 |
report here backends_ips |
| pool_members_tls_ports | 80,80,80 |
Even when using TLS the termination is done before so it speaks HTTP with the backends |
TLS termination
By default the stack will create a TLS listener to terminate TLS connections, understand handling HTTPS requests.
Info
If you wish to skip that part and simply disable that feature set listener_tls_enabled: 'true' to false
In order to work there is an extra step "ex-catherda" to achieve, get the SSL certificate.
Either you have a valid, signed certificate or you want a self-signed one.
self-signed certificate (optional)
openssl req -newkey rsa:2048 -x509 -sha256 -days 365 -nodes \
            -out tls.crt -keyout tls.key \
            -subj "/CN=myloadbalancer-01.mydomain.infomaniak.cloud/emailAddress=myemail@infomaniak.ch"
Import the certificate
Before moving one you may need to convert a pkcs12 format.
Use the following command to convert a crt + key file to a pkcs12 one.
openssl pkcs12 -export -inkey tls.key -in tls.crt -passout pass: -out tls.p12
Then
base64 < tls.p12
Copy the output from this command and update secret_* parameters in env.yaml accordingly
Cloud-init
This project embed a custom cloud-init configuration file that do several things :
- install
apache2package -
enable SSH as root
About SSH login
Using some cloud images, new instances come up with a default user
debianorubuntudepending from the distribuion, which is the one you have to use to SSH as, then you can escalate as root usingsudo su -.The given cloud-init configuration will let you use root to SSH. If you wish to bring back the default behavior feel free to adapt
lib/cloud-init.conf. -
remove unused / default cloud-init module like
puppet,chef,salt-minionorphone-homeInfo
Find more informations about cloud-init modules in the official cloud-init documentation
Deployment
Creating the stack
Once you have reviewed all the parameters you can pop-up the stack using the following command
% openstack stack create --wait -e env.yaml -t template.yml LB1

2021-12-29 15:09:42Z [LB1]: CREATE_IN_PROGRESS  Stack CREATE started
2021-12-29 15:09:43Z [LB1.security_group_http]: CREATE_IN_PROGRESS  state changed
2021-12-29 15:09:43Z [LB1.security_group_http]: CREATE_COMPLETE  state changed
2021-12-29 15:09:44Z [LB1.secret]: CREATE_IN_PROGRESS  state changed
2021-12-29 15:09:44Z [LB1.secret]: CREATE_COMPLETE  state changed
2021-12-29 15:09:45Z [LB1.security_group_ssh]: CREATE_IN_PROGRESS  state changed
2021-12-29 15:09:45Z [LB1.security_group_ssh]: CREATE_COMPLETE  state changed
2021-12-29 15:09:46Z [LB1.router]: CREATE_IN_PROGRESS  state changed
2021-12-29 15:09:47Z [LB1.load_balancer]: CREATE_IN_PROGRESS  state changed
2021-12-29 15:09:48Z [LB1.network]: CREATE_IN_PROGRESS  state changed
2021-12-29 15:09:48Z [LB1.network]: CREATE_COMPLETE  state changed
2021-12-29 15:09:48Z [LB1.subnet]: CREATE_IN_PROGRESS  state changed
2021-12-29 15:09:49Z [LB1.subnet]: CREATE_COMPLETE  state changed
2021-12-29 15:09:49Z [LB1.servers]: CREATE_IN_PROGRESS  state changed
2021-12-29 15:09:50Z [LB1.router]: CREATE_COMPLETE  state changed
2021-12-29 15:09:50Z [LB1.router_interface]: CREATE_IN_PROGRESS  state changed
2021-12-29 15:09:53Z [LB1.router_interface]: CREATE_COMPLETE  state changed
2021-12-29 15:10:13Z [LB1.servers]: CREATE_COMPLETE  state changed
2021-12-29 15:11:38Z [LB1.load_balancer]: CREATE_COMPLETE  state changed
2021-12-29 15:11:38Z [LB1.listener_tls]: CREATE_IN_PROGRESS  state changed
2021-12-29 15:11:38Z [LB1.listeners]: CREATE_IN_PROGRESS  state changed
2021-12-29 15:11:44Z [LB1.listener_tls]: CREATE_COMPLETE  state changed
2021-12-29 15:11:44Z [LB1.pool_tls]: CREATE_IN_PROGRESS  state changed
2021-12-29 15:11:50Z [LB1.pool_tls]: CREATE_COMPLETE  state changed
2021-12-29 15:11:50Z [LB1.pool_members_tls]: CREATE_IN_PROGRESS  state changed
2021-12-29 15:12:13Z [LB1.listeners]: CREATE_COMPLETE  state changed
2021-12-29 15:12:13Z [LB1.pools]: CREATE_IN_PROGRESS  state changed
2021-12-29 15:12:16Z [LB1.pool_members_tls]: CREATE_COMPLETE  state changed
2021-12-29 15:12:25Z [LB1.pools]: CREATE_COMPLETE  state changed
2021-12-29 15:12:25Z [LB1.pools_members]: CREATE_IN_PROGRESS  state changed
2021-12-29 15:12:25Z [LB1.health_monitor]: CREATE_IN_PROGRESS  state changed
2021-12-29 15:12:29Z [LB1.health_monitor]: CREATE_COMPLETE  state changed
2021-12-29 15:12:56Z [LB1.pools_members]: CREATE_COMPLETE  state changed
2021-12-29 15:12:56Z [LB1]: CREATE_COMPLETE  Stack CREATE completed successfully
+---------------------+----------------------------------------------------------------------------------------------------+
| Field               | Value                                                                                              |
+---------------------+----------------------------------------------------------------------------------------------------+
| id                  | 954ed430-817f-487c-9fa9-f18f48507ac4                                                               |
| stack_name          | LB1                                                                                                |
| description         | Load-balancer stack with three HTTP backends, SSH access, HTTP health monitors and TLS termination |
| creation_time       | 2021-12-29T15:09:42Z                                                                               |
| updated_time        | None                                                                                               |
| stack_status        | CREATE_COMPLETE                                                                                    |
| stack_status_reason | Stack CREATE completed successfully                                                                |
+---------------------+----------------------------------------------------------------------------------------------------+
If you got so far you can issue the following command to get the entry point IP address of your stack.
% openstack stack show --fit-width -c outputs LB1
+---------+-----------------------------------------+
| Field   | Value                                   |
+---------+-----------------------------------------+
| outputs | - description: load-balancer IP address |
|         |   output_key: load-balancer-IP          |
|         |   output_value: 195.15.242.xx           |
|         | - description: website URL              |
|         |   output_key: website-URL               |
|         |   output_value: http://195.15.242.xx/   |
|         |                                         |
+---------+-----------------------------------------+
Ctrl / CMD + click on the link should bring you to the Apache2 default page. If so, have a piece of  .
.
Updating the stack
Feel free to update any parameters and update the stack.
Info
If you scale-up/down, do not forget to adjust all necessary parameters accordingly, please refer to the Parameters section
openstack stack update --wait -e env.yaml -t template.yml LB1
Deleting the stack
If anything goes wrong you may want to delete the stack to restart from a clean state.
openstack stack delete --wait --yes LB1